Ceramic Coating Maintenance: Complete Care Guide
Congratulations—you've invested in professional ceramic coating for your vehicle! You've made one of the smartest decisions possible for protecting your paint and maintaining that stunning showroom appearance. But here's the truth: even the highest-quality ceramic coating requires proper maintenance to deliver its full lifespan and peak performance.
The good news? Maintaining ceramic coating is dramatically easier than caring for unprotected paint or traditionally waxed vehicles. The bad news? Using the wrong products or techniques can diminish your coating's performance or even damage it prematurely. In this comprehensive guide, we'll teach you everything you need to know about ceramic detailing maintenance, from proper washing techniques to product recommendations and common mistakes to avoid.
Understanding Ceramic Coating Maintenance Requirements
Before diving into specific care instructions, it's important to understand why ceramic coating requires specific maintenance approaches:
How Ceramic Coating Differs from Traditional Protection
Traditional wax and sealants sit on top of your paint as a sacrificial layer that wears away over time. Ceramic coating, however, chemically bonds to your paint at a molecular level, becoming a semi-permanent extension of your clear coat. This fundamental difference means:
- You can't simply "reapply" ceramic coating like wax (it requires professional preparation)
- Harsh chemicals can damage the coating's molecular structure
- Proper care maintains the coating's hydrophobic properties and longevity
- Neglect or improper care accelerates performance degradation
What "Maintenance" Actually Means
Ceramic coating maintenance involves three key goals:
- Preserving hydrophobic properties: Keeping the surface's extreme water-repelling characteristics intact
- Preventing contamination buildup: Removing contaminants before they bond to or damage the coating
- Maintaining surface integrity: Protecting the coating from chemical degradation, physical damage, and environmental wear
The Golden Rules of Ceramic Coating Care
Follow these fundamental principles for successful ceramic coating maintenance:
Rule 1: Use Only pH-Neutral Products
Ceramic coatings are chemically bonded to your paint and can be damaged by highly acidic (pH < 6) or highly alkaline (pH > 9) products. Always use pH-neutral (pH 7-8) car soaps, detail sprays, and maintenance products specifically formulated for ceramic coatings.
Rule 2: Regular Washing is Essential
While ceramic coating makes your vehicle stay cleaner longer, regular washing (every 2 weeks) is still crucial. Contaminants that sit on the coating for extended periods can bond to or etch into the surface, reducing performance.
Rule 3: Proper Technique Prevents Damage
Even with superior scratch resistance, ceramic coating can still be damaged by improper washing techniques. Avoid automatic car washes, use quality microfiber products, and follow the two-bucket method.
Rule 4: Immediate Contaminant Removal
Bird droppings, tree sap, bug splatter, and industrial fallout should be removed within 24-48 hours. These contaminants contain acids that can etch into even ceramic-coated surfaces if left unattended.
Rule 5: Periodic Boost Applications
Ceramic boost sprays or topper products applied every 3-6 months refresh the coating's hydrophobic properties, add additional protection layers, and extend overall coating lifespan.
Step-by-Step: The Perfect Ceramic Coating Wash
Proper washing technique is the foundation of ceramic coating maintenance. Follow this comprehensive process for optimal results:
Equipment and Products You'll Need
- Two 5-gallon wash buckets with grit guards
- pH-neutral ceramic coating wash soap
- High-quality microfiber wash mitt (not sponges or brushes)
- Separate wheel cleaning tools and products
- Multiple plush microfiber drying towels
- Garden hose with adjustable nozzle or pressure washer (low pressure)
- Ceramic coating detail spray or quick detailer
- Optional: Foam cannon for touchless pre-wash
Step 1: Rinse the Vehicle (5 Minutes)
Begin by thoroughly rinsing your entire vehicle with water to remove loose dirt, dust, and debris. This prevents scratching during the contact wash phase.
- Start from the top and work downward
- Use moderate water pressure—ceramic coating's hydrophobic properties help water sheet off easily
- Pay special attention to wheel wells, lower panels, and behind wheels where dirt accumulates
- Ensure all easily removable debris is gone before touching the paint
Step 2: Clean the Wheels First (10 Minutes)
Always clean wheels before washing the body to prevent wheel contaminants from splashing onto freshly cleaned paint.
- Use dedicated wheel cleaning tools that never touch painted surfaces
- Apply ceramic-safe wheel cleaner (verify pH-neutral if wheels are ceramic coated)
- Agitate with wheel brushes, paying attention to brake dust buildup
- Rinse thoroughly before proceeding to the body
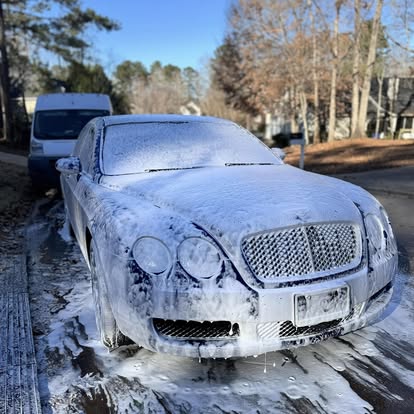
Step 3: Foam Pre-Wash (Optional but Recommended, 5 Minutes)
A foam cannon pre-wash provides a touchless cleaning step that helps soften and lift contaminants before hand washing.
- Fill foam cannon with pH-neutral soap diluted according to instructions
- Apply thick foam covering the entire vehicle
- Allow foam to dwell for 3-5 minutes (don't let it dry)
- Rinse thoroughly from top to bottom
Step 4: Two-Bucket Hand Wash (15-20 Minutes)
The two-bucket method prevents reintroducing dirt and contaminants to your clean wash mitt:
Setup:
- Bucket 1: Clean water with pH-neutral soap
- Bucket 2: Clear rinse water
- Both buckets should have grit guards at the bottom
Washing Process:
- Start at the top of the vehicle (roof) and work downward
- Dip wash mitt in soapy water, wring out excess
- Wash one panel section using straight, overlapping passes (not circular motions)
- After each panel, rinse mitt thoroughly in rinse bucket, agitate against grit guard
- Return to soap bucket and continue
- Work systematically: roof → glass → hood → trunk → upper doors → lower doors → bumpers → rocker panels
- Save the dirtiest areas (lower panels, behind wheels) for last
- Rinse each section after washing to prevent soap from drying
Step 5: Final Rinse (5 Minutes)
Perform a final, thorough rinse to remove all soap residue:
- Use sheeting technique: remove spray nozzle and let water flow freely over panels
- The strong hydrophobic properties of ceramic coating cause water to sheet off dramatically
- This sheeting action removes most water, making drying easier
- Ensure no soap remains in crevices, around trim, or in door jambs
Step 6: Drying (10 Minutes)
Proper drying prevents water spots and maintains coating appearance:
- Use large, plush microfiber drying towels (800+ GSM)
- Pat and drag technique rather than circular rubbing
- Start from top and work downward
- Use separate towels for wheels/lower panels vs. upper panels
- For ultimate scratch prevention, use forced air (leaf blower or dedicated car dryer)
- Pay attention to water trapped in mirrors, door handles, emblems, and trim gaps
Step 7: Optional Boost Application (5-10 Minutes)
After washing, it's an ideal time to apply ceramic boost spray:
- Work on one panel at a time in shade (never in direct sunlight)
- Spray ceramic boost product onto clean microfiber towel
- Wipe onto panel in straight, overlapping passes
- Immediately buff with clean, dry microfiber towel
- Continue panel by panel until entire vehicle is treated
Recommended Maintenance Products
Using the right products is crucial for ceramic coating longevity. Here are our professional recommendations:
pH-Neutral Car Soaps
- Gtechniq GWash: Specifically formulated for ceramic coatings, excellent cleaning power
- CarPro Reset: Cleanses without removing coating, resets hydrophobic properties
- Gyeon Bathe: Gentle, high-lubricity formula safe for all coatings
- Koch Chemie Gentle Snow Foam: Excellent pre-wash foam, pH-neutral
Ceramic Boost/Maintenance Sprays
- Gtechniq C2v3: Industry-standard ceramic detail spray, 3-6 month durability
- CarPro Reload: SiO2-based spray sealant, refreshes hydrophobic properties
- Gyeon Cure: Easy-to-use maintenance spray with excellent beading
- IGL Ecoshine Premier: Premium spray sealant with strong water behavior
Quick Detailer/Spot Cleaning
- Optimum No Rinse (ONR): Ultra-safe waterless wash and quick detailer
- P&S Bead Maker: Excellent slickness, safe for ceramic coatings
- Sonax Brilliant Shine Detailer: Streak-free finish, ceramic-safe
Microfiber Products
- Wash Mitts: The Rag Company Cyclone or Eagle Edgeless 500
- Drying Towels: The Rag Company Dry Me A River (20"x40", 1100 GSM)
- Buffing Towels: Gyeon Silk Dryer or The Rag Company Edgeless 365
Common Ceramic Coating Maintenance Mistakes
Avoid these common errors that can damage your coating or reduce its lifespan:
1. Using Automatic Car Washes
The Problem: Automatic car washes use harsh chemicals, high pH soaps, and abrasive brushes that can degrade ceramic coating and cause surface scratching.
The Solution: Always hand wash or use touchless car washes only. The time you save isn't worth damaging your investment.
2. Applying Traditional Wax or Sealants
The Problem: Traditional waxes contain chemicals and polymers that interfere with ceramic coating's hydrophobic properties and can cause bonding issues.
The Solution: Use only ceramic-specific maintenance products designed to work with coatings, not against them.
3. Washing in Direct Sunlight
The Problem: Washing in direct sun causes water and soap to dry quickly, leaving water spots and potentially etching into the coating.
The Solution: Wash in shade or during cooler parts of the day (morning/evening). If spots form, remove immediately with detail spray.
4. Using Harsh Wheel Cleaners on Coated Wheels
The Problem: Many wheel cleaners are highly acidic and will damage ceramic coating applied to wheels.
The Solution: Verify wheel cleaners are pH-neutral and ceramic-safe, or use the same soap you use on painted surfaces.
5. Neglecting Regular Washing
The Problem: Even with ceramic coating, contaminants that sit for weeks or months can bond to or etch into the surface.
The Solution: Maintain a bi-weekly washing schedule minimum, weekly during high-pollen seasons or after bug-heavy drives.
6. Aggressive Scrubbing of Stubborn Contaminants
The Problem: Scrubbing bird droppings, tar, or bugs can scratch the coating and reduce its protective qualities.
The Solution: Soak stubborn contaminants with quick detailer or soap for several minutes to soften them, then gently wipe away.
7. Skipping Boost Applications
The Problem: Without periodic boost applications, the coating's hydrophobic properties gradually diminish faster than necessary.
The Solution: Apply ceramic boost spray every 3-6 months after washing. This 30-minute investment dramatically extends coating life.
Seasonal Maintenance Considerations for South Carolina
South Carolina's climate presents unique seasonal challenges for ceramic coating maintenance:
Spring (March-May): Pollen Season
- Increase washing frequency to weekly due to heavy pollen
- Rinse pollen off daily if possible to prevent buildup
- Never wipe dry pollen—always rinse first to prevent scratching
- Apply ceramic boost spray after pollen season to refresh coating
Summer (June-August): UV and Heat
- Park in shade whenever possible to reduce UV exposure
- Wash more frequently to remove heat-absorbing contaminants
- Always dry water spots immediately—heat accelerates etching
- Use ceramic boost products with strong UV inhibitors
Fall (September-November): Leaves and Sap
- Remove fallen leaves and tree sap immediately
- Increase inspection for bird droppings under trees
- Consider professional decontamination if sap is severe
- Prepare coating for winter with fresh boost application
Winter (December-February): Road Salt and Moisture
- Rinse undercarriage regularly if driving in areas using road salt
- Remove road grime more frequently
- Watch for water spots from frequent rain—dry as needed
- End of winter: Professional inspection recommended
When to Seek Professional Maintenance
While regular maintenance is DIY-friendly, certain situations require professional attention:
Annual Professional Decontamination
Schedule professional decontamination once per year to remove embedded contaminants regular washing can't eliminate. This includes:
- Chemical decontamination (iron remover, tar remover)
- Clay bar treatment to remove bonded particles
- Professional inspection of coating condition
- Professional-grade ceramic boost application
- Cost: $150-300, extends coating life significantly
Water Behavior Has Diminished
If water no longer beads tightly or sheets off dramatically, professional evaluation can determine if:
- The coating just needs decontamination and boost application
- Contamination has built up requiring professional removal
- The coating has worn to the point where reapplication is needed
Visible Etching or Staining
If bird droppings, water spots, or other contaminants have etched into the coating:
- Professionals can assess if light polishing can correct the issue
- Spot treatment may be possible without full reapplication
- Attempting DIY correction risks damaging the coating further
Conclusion: Simple Maintenance, Lasting Results
Ceramic coating maintenance is straightforward when you follow proper techniques and use the right products. The key takeaways are:
- Regular bi-weekly washing with pH-neutral products and proper technique
- Immediate removal of contaminants within 24-48 hours
- Periodic ceramic boost applications every 3-6 months
- Annual professional decontamination and inspection
- Avoiding automatic car washes, harsh chemicals, and improper techniques
Following these guidelines ensures your ceramic coating delivers its full rated lifespan, maintains peak hydrophobic performance, and keeps your vehicle looking showroom fresh for years. The small time investment in proper maintenance protects your larger investment in professional ceramic coating.
Need professional ceramic coating maintenance, decontamination, or inspection? Contact us today to schedule your service. Our expert technicians will assess your coating's condition, perform professional-grade maintenance, and ensure you're getting maximum value and protection from your ceramic coating investment. Your vehicle deserves the best care—let us help you maintain its stunning appearance!